
Quartz2D
2016-08-25
1.说明
Quartz 2D 是一个二维绘图引擎,同时支持ios和mac系统。Quartz 2D能完成以下工作:
- 绘制图形:线条\三角形\矩形\圆\弧等
- 绘制文字
- 绘制\生成图片(图像)
- 读取\生成PDF
- 截图\裁剪图片
- 自定义UI控件
图形上下文
图形上下文(Graphics Context):是一个CGContextRef类型的数据。
作用:
- 保存绘图信息,绘图状态。
- 决定回执的输出目标(绘制到什么地方去?),输出目标可以使PDF文件、Bitmap或者显示器窗口上。 步骤: 绘制好的图形(保存)->图形上下文(显示)->输出目标
2.画线
1)画一条线
画如下图所示的一条线,有以下几种方式:

第一种方式:
- (void)drawLine1
{
// 1. 获取图形上下文
CGContextRef ctx = UIGraphicsGetCurrentContext();

// 2. 描述路径
CGMutablePathRef path= CGPathCreateMutable();

// 设置起点
CGPathMoveToPoint(path, NULL, 50, 50);

// 添加一根线到某个点
CGPathAddLineToPoint(path, NULL, 200, 200);

// 3. 把路径添加到上下文
CGContextAddPath(ctx, path);

// 4. 渲染上下文
CGContextStrokePath(ctx); }
第二种方式:
- (void)drawLine2
{
    // 1. 获取图形上下文
    CGContextRef ctx = UIGraphicsGetCurrentContext();

    // 描述路径
    // 设置起点
    CGContextMoveToPoint(ctx, 50, 50);
    CGContextAddLineToPoint(ctx,200, 200);
    // 渲染上下文
    CGContextStrokePath(ctx);

}
第三种方式:
- (void)drawLine3
{
    // 贝瑟尔路径
    // 创建路径
    UIBezierPath *path = [UIBezierPath bezierPath];
    // 设置起点
    [path moveToPoint:CGPointMake(50, 50)];
    // 添加一根线到某个点
    [path addLineToPoint:CGPointMake(200, 200)];
    // 绘制路径
    [path stroke];
}
2)画两条线
1.如图所示

代码:
- (void)drawCtxState
{
    // 获取上下文
    CGContextRef ctx = UIGraphicsGetCurrentContext();
    // 描述路径
    CGContextMoveToPoint(ctx, 50, 50);
    CGContextAddLineToPoint(ctx, 100, 50);
    // 默认下一根线的起点就是上一根线的终点
    CGContextAddLineToPoint(ctx, 100, 200);

    // 设置绘图状态
    // 颜色
    [[UIColor redColor] setStroke];

    // 线宽
    CGContextSetLineWidth(ctx, 20);

    // 设置连接样式
    CGContextSetLineJoin(ctx, kCGLineJoinBevel);

    // 设置顶角样式
    CGContextSetLineCap(ctx, kCGLineJoinRound);

    // 渲染上下文
    CGContextStrokePath(ctx);
}
- 如图所示:

代码:
- (void)drawUIBezierState
{
    UIBezierPath *path = [UIBezierPath bezierPath];
    [path moveToPoint:CGPointMake(50, 50)];
    [path addLineToPoint:CGPointMake(200, 200)];
    path.lineWidth = 10;
    [[UIColor redColor] set];
    [path stroke];

    UIBezierPath *path1 = [UIBezierPath bezierPath];
    [path1 moveToPoint:CGPointMake(0, 0)];
    [path1 addLineToPoint:CGPointMake(30, 60)];
    [[UIColor greenColor] set];
    path1.lineWidth = 3;
    [path1 stroke];

}
3)绘制曲线
如图所示:

代码:
- (void)drawRect:(CGRect)rect {
    // Drawing code
    // 绘制曲线
    // 原生绘制方法
    CGContextRef ctx = UIGraphicsGetCurrentContext();

    // 描述路径
    // 设置起点
    CGContextMoveToPoint(ctx, 50, 50);

    // cpx:控制点的x  cpy:控制点的y
    CGContextAddQuadCurveToPoint(ctx, 150, 20, 250, 50);

    // 渲染上下文
    CGContextStrokePath(ctx);
}
3.画图形
1)圆角矩形
UIBezierPath *path = [UIBezierPath bezierPathWithRoundedRect:CGRectMake(20, 20, 200, 200) cornerRadius:10];
    [path stroke];
2)圆形
// 线条圆形
UIBezierPath *path = [UIBezierPath bezierPathWithRoundedRect:CGRectMake(20, 20, 200, 200) cornerRadius:100];
[path stroke];
// 填充
UIBezierPath *path = [UIBezierPath bezierPathWithRoundedRect:CGRectMake(20, 20, 200, 200) cornerRadius:100];
[path fill];  // 填充:必须是一个完整的封闭路径
3)圆弧
    // center: 圆心
    // startAngle : 弧度
    // clockwise: YES:顺时针  NO:逆时针
    UIBezierPath *path = [UIBezierPath bezierPathWithArcCenter:CGPointMake(125, 125) radius:100 startAngle:0 endAngle:M_PI_2 clockwise:YES];
    [path stroke];
4)扇形
 CGPoint center = CGPointMake(125, 125);
    UIBezierPath *path = [UIBezierPath bezierPathWithArcCenter:center radius:100 startAngle:0 endAngle:M_PI_2 clockwise:YES];
    // 添加一根线到圆形
    [path addLineToPoint:center];

    // 关闭路径:默认从路径的终点到起点
    [path closePath];

    // 填充 : 必须是一个封闭的路径,默认会自动关闭路径
    [path fill];
4.重绘
说明
只要在 drawRect:(CGRect)rect 方法中才能获取到图形上下文。但是图形上下文我们自己创建不了,只能由系统创建,然后传递给我们。所以 drawRect 不能手动调用。
重绘图形使用 [self setNeedsDisplay] ,系统会首先创建于view相关联的上下文,然后调用 drawRect 。
例子
我们要写一个下载进度条的demo,如图所示:

关键代码:
ViewController:
#import "ViewController.h"
#import "DownloadProgressView.h"

@interface ViewController ()
@property (weak, nonatomic) IBOutlet UILabel *progressValueLab;

@property (weak, nonatomic) IBOutlet DownloadProgressView *progressView;
@end

@implementation ViewController

- (void)viewDidLoad {
    [super viewDidLoad];
    // Do any additional setup after loading the view, typically from a nib.
}

- (void)didReceiveMemoryWarning {
    [super didReceiveMemoryWarning];
    // Dispose of any resources that can be recreated.
}

- (IBAction)slideProgress:(UISlider *)slider {
    self.progressValueLab.text = [NSString stringWithFormat:@"%.2f%%",slider.value * 100];
    self.progressView.progress = slider.value;
}
DownloadProgressView:
#import "DownloadProgressView.h"

@implementation DownloadProgressView


- (void)setProgress:(float)progress
{
    _progress = progress;

    // 重绘
    [self setNeedsDisplay];

}

// Only override drawRect: if you perform custom drawing.
// An empty implementation adversely affects performance during animation.
- (void)drawRect:(CGRect)rect {
    // Drawing code

    // 创建贝瑟尔路径
    CGFloat radius = rect.size.width * 0.5;
    CGPoint center = CGPointMake(radius, radius);

    CGFloat endA = -M_PI_2 + _progress * M_PI * 2;

    UIBezierPath *path = [UIBezierPath bezierPathWithArcCenter:center radius:radius-10 startAngle:-M_PI_2 endAngle:endA clockwise:YES];
    [path stroke];
}
示例代码: DownloadProgress
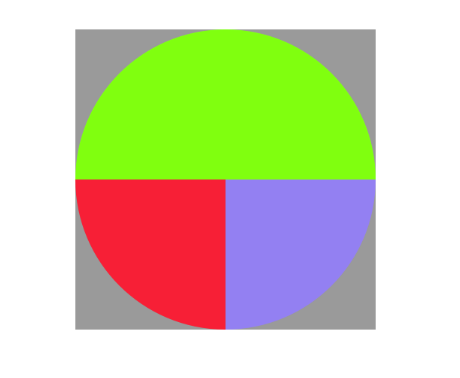
5.饼状图
效果图如图所示:
代码:
- (void)drawRect:(CGRect)rect {
    // Drawing code

    NSArray *array = @[@25,@25,@50];

    CGFloat radius = rect.size.width * 0.5;
    CGPoint center = CGPointMake(radius, radius);

    CGFloat startA = 0;
    CGFloat angle = 0;
    CGFloat endA = 0;

    for (int i = 0; i < array.count; i++) {
        startA = endA;
        angle = [array[i] doubleValue] / 100.0 * M_PI * 2;
        endA = startA + angle;
        UIBezierPath *path = [UIBezierPath bezierPathWithArcCenter:center radius:radius startAngle:startA endAngle:endA clockwise:YES];
        [path addLineToPoint:center];

        [[self colorRandom] set];

        [path fill];
    }
}
- (UIColor *)colorRandom
{
    CGFloat r = arc4random_uniform(256) / 255.0;
    CGFloat g = arc4random_uniform(256) / 255.0;
    CGFloat b = arc4random_uniform(256) / 255.0;
    return [UIColor colorWithRed:r green:g blue:b alpha:1];
}

- (void)touchesBegan:(NSSet *)touches withEvent:(UIEvent *)event
{
    [self setNeedsDisplay];
}
6.柱状图
效果图如图所示:

代码:
- (void)drawRect:(CGRect)rect {

    NSArray *arr = @[@25,@25,@50];

    CGFloat x = 0;
    CGFloat y = 0;
    CGFloat w = 0;
    CGFloat h = 0;

    for (int i = 0; i < arr.count; i++) {
        w = rect.size.width / (2 * arr.count -1);
        x = 2 * w * i;
        h = [arr[i] floatValue] / 100.0 * rect.size.height;
        y = rect.size.height - h;

        UIBezierPath *path = [UIBezierPath bezierPathWithRect:CGRectMake(x, y, w, h)];

        [[self colorRandom] set];

        [path fill];
    }
}
7.绘制文字和图片
1)绘制文字
效果图如图:

代码:
// 绘制文字
- (void)drawWords
{
    NSString *words = @"Hello World!!";

    // Text attributes
    NSMutableDictionary *textDict = [NSMutableDictionary dictionary];

    // 文字颜色
    textDict[NSForegroundColorAttributeName] = [UIColor redColor];

    // 字体
    textDict[NSFontAttributeName] = [UIFont systemFontOfSize:30];

    // 设置文字的空心颜色和宽度
    textDict[NSStrokeWidthAttributeName] = @3;
    textDict[NSStrokeColorAttributeName] = [UIColor yellowColor];

    // 创建阴影对象
    NSShadow *shadow = [[NSShadow alloc] init];
    shadow.shadowColor = [UIColor greenColor];
    shadow.shadowOffset = CGSizeMake(4, 4);
    shadow.shadowBlurRadius = 3;
    textDict[NSShadowAttributeName] = shadow;

    // 富文本:给普通的文字添加颜色,字体大小
//    [words drawAtPoint:CGPointZero withAttributes:textDict];  // 不会自动换行
    [words drawInRect:self.bounds withAttributes:textDict]; // 会自动换行

}
2)绘制图片
绘制图片代码:
// 绘制图片
- (void)drawImages
{
    // 超出裁剪区域的内容全部裁减掉,裁剪必须放在绘制之前
    UIRectClip(CGRectMake(0, 0, 50, 50));
    UIImage *image = [UIImage imageNamed:@"001"];

    // 绘图
    [image drawAsPatternInRect:self.bounds];
}
3)自定义UIImageView
代码:
TVUImageView.h
#import <UIKit/UIKit.h>

@interface TVUImageView : UIView
@property (nonatomic,strong) UIImage *image;

- (instancetype)initWithImage:(UIImage *)image;
@end
TVUImageView.m
#import "TVUImageView.h"

@implementation TVUImageView


- (instancetype)initWithImage:(UIImage *)image
{
    self = [super initWithFrame:CGRectMake(0, 0, image.size.width, image.size.height)];
    if (self) {
        _image = image;
    }
    return self;
}

- (void)setImage:(UIImage *)image
{
    _image = image;
    [self setNeedsDisplay];  // 重绘
}

// Only override drawRect: if you perform custom drawing.
// An empty implementation adversely affects performance during animation.
- (void)drawRect:(CGRect)rect {
    // Drawing code

    [_image drawInRect:rect];
}


@end
4)绘图时使用定时器
在绘图的时候很少使用 NSTimer 开启一个定时器,因为其调度优先级别比较低,并不会准时调用。 因此需要使用 CADisplayLink 开启一个定时器。
下面来看一个雪花的例子:
#import "DrawView.h"
static CGFloat _snowY = 0;
@implementation DrawView


// Only override drawRect: if you perform custom drawing.
// An empty implementation adversely affects performance during animation.
- (void)drawRect:(CGRect)rect {
    // Drawing code

    UIImage *image = [UIImage imageNamed:@"雪花"];
    [image drawAtPoint:CGPointMake(50, _snowY)];
    _snowY += 10;
    if (_snowY > rect.size.height) {
        _snowY = 0;
    }

}

/*
 如果在绘图的时候需要用到定时器,通常
 NSTimer很少用于绘图,因为调度优先级比较低,并不会准时调用  */
- (void)awakeFromNib
{
    CADisplayLink *link = [CADisplayLink displayLinkWithTarget:self selector:@selector(timeChange)];
    [link addToRunLoop:[NSRunLoop mainRunLoop] forMode:NSDefaultRunLoopMode];
}

- (void)timeChange
{
    // 注意:这个方法并不会马上调用drawRect,这个方法只是给当前控件添加刷新的标记,等下一次屏幕刷新的时候才会调用drawRect
    [self setNeedsDisplay];
}

@end
自定义View
首先,得有图形上下文,因为它能保存绘图信息,并且决定着绘制到什么地方去。其次,那个图形上下文必须跟view相关联,才能将内容绘制到view上面。
自定义view的步骤:
- 新建一个类,继承自UIView
- 实现 - (void)drawRect:(CGRect)rect方法,然后在这个方法中: 1.取得跟当前view相关联的图形上下文 2.绘制相应的图形内容 3.利用图形上下文将绘制的内容渲染显示到view上面